Hey everyone! It’s been a while since my last post.
This time, I’m kicking off a new series that will serve as both a practice guide and a follow-up to the GOAD WriteUp. We’ll go from reconnaissance all the way to gaining control and analyzing an Active Directory (AD) infrastructure. I’ll mostly follow the same route but with some tweaks to reflect changes and sprinkle in some real-life experience from my work. I won’t go super deep into the technical details—otherwise, I’d end up writing a book (or two! 😄)—but I’ll include helpful resources if you want to dive deeper. And as always, the comments section is open! My goal here is to explain technical concepts in a clear and friendly way so that even beginners can follow along and learn.
What is Active Directory?
Active Directory is a hierarchical structure that stores information about objects on a network. A directory service, such as Active Directory Domain Services (AD DS), provides the means to store directory data and make it accessible to users and administrators across the network. For example, AD DS stores info about user accounts like names, passwords, phone numbers, and so on, and lets authorized users access that data.
A great, concise resource on AD can be found in this HTB blog post .
Initial Considerations
What is a Domain Controller (DC)?
A Domain Controller is a critical server within an AD infrastructure. It handles user authentication and enforces security policies. In enterprise environments, it’s one of the most essential components.
Domain Controllers are crucial because they manage authentication and security policies across the network.
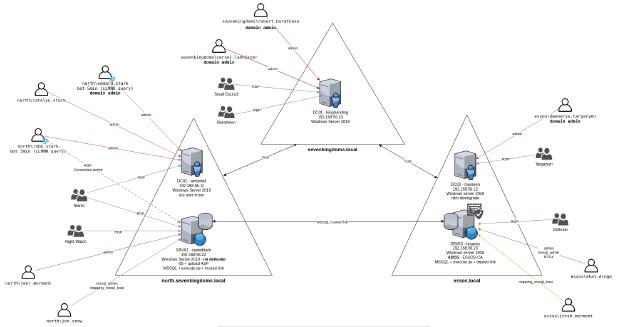
Lab Structure
- Network Range: We’ll be working within the 192.168.56.0/24 range.
- AD Structure:
- 3 Domains across 2 Forests
- 3 Domain Controllers (DCs): One per domain

Network Enumeration
Let’s start by scanning our lab environment to find available IPs. Just like in the GOAD WriteUp, we can do this in two ways: directly scanning IPs, or using NetExec.
Keep in mind that NetExec-type scans will only detect hosts if the relevant protocol is active—unlike Nmap, which checks all specified ports.
Recon with NetExec (formerly crackmapexec)
NetExec is a powerful tool used in pentesting and security audits. It can remotely execute commands on network machines, especially those that are part of an Active Directory domain. It’s primarily used to simplify remote command/script execution across a domain without needing physical access.
*I won’t go into too much detail about NetExec’s syntax or full capabilities since that’s not the goal of this post. But if you’d like a deep-dive NetExec series, let me know in the comments! :)
A fast technique to identify AD hosts is running:
netexec smb 192.168.56.0/24
This command lists hosts with SMB enabled—great for getting a first look at the AD network.

As shown, we now know:
- north.sevenkingdoms.local (2 IPs)
- CASTELBLACK (Windows Server 2019) (signing false)
- WINTERFELL (Windows Server 2019)
- sevenkingdoms.local (1 IP)
- KINGSLANDING (Windows Server 2019)
- essos.local (2 IPs)
- BRAAVOS (Windows Server 2016) (signing false)
- MEEREEN (Windows Server 2016)
By default, Microsoft sets SMB signing to true or required on DCs. So it’s likely that the servers with signing enabled are the DCs.
In a secure environment, SMB signing should be valid everywhere to avoid NTLM relaying attacks.
Recon with Nmap
Nmap is a network scanning tool that helps discover active devices and services on a reachable network. As with NetExec, I won’t go too deep here—there are tons of blogs and tutorials on Nmap.
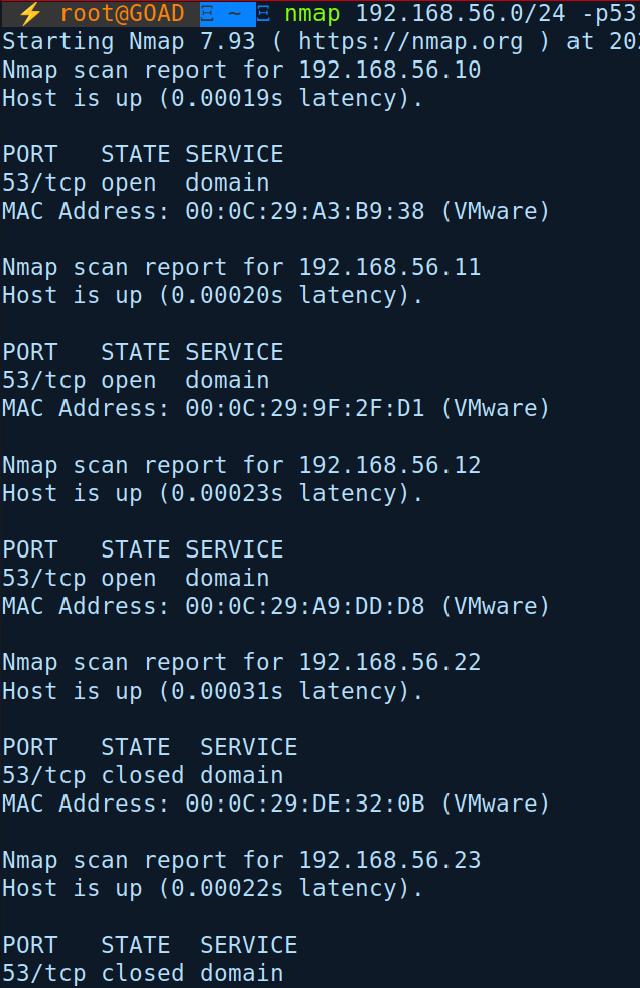
A Domain Controller typically has port 53 (DNS) and port 88 (Kerberos) open. So we can scan for that:
nmap -Pn -p 53 192.168.56.0/24

We found 3 hosts with port 53 open—likely our DCs.
Why identify the DCs?
They’re prime targets in an AD environment. Admin access to a DC means domain control—and even low-level domain access can help extract valuable info.
A more detailed scan is often helpful, though in real environments it may not be stealthy or efficient:
nmap -Pn -p- -sC -sV -oA full_scan_goad 192.168.56.10-12,22-23
Breakdown:
-Pn: skip host discovery (assumes all are up)-p-: scan all 65535 ports (instead of just the top 1000)-sC: run default scripts-sV: version detection-oA: save results in 3 formats (Nmap, Grep, XML)- IP range:
192.168.56.10-12,22-23
Using nslookup to Confirm DC IPs
You can verify if an IP belongs to a DC with nslookup. For example, for the sevenkingdoms domain:
nslookup -type=srv _ldap._tcp.dc._msdcs.sevenkingdoms.local 192.168.56.10
A response suggests the IP is indeed a Domain Controller.

If there’s no response, it likely isn’t a DC.
Now it’s your turn to try it with the remaining servers!
Basic Linux Configuration
Now that we’ve identified the DCs, let’s configure our Linux environment to interact with them effectively.
Set Up DNS
Edit /etc/hosts to map IPs to hostnames:
# /etc/hosts
# GOAD
192.168.56.10   sevenkingdoms.local kingslanding.sevenkingdoms.local kingslanding
192.168.56.11   winterfell.north.sevenkingdoms.local north.sevenkingdoms.local winterfell
192.168.56.12   essos.local meereen.essos.local meereen
192.168.56.22   castelblack.north.sevenkingdoms.local castelblack
192.168.56.23   braavos.essos.local braavos
Set Up Kerberos
We’ll also configure Kerberos on Linux. Start by installing the client:
sudo apt update
sudo apt install krb5-user
If it’s already installed, reconfigure it with:
dpkg-reconfigure krb5-config
This step integrates your Linux machine with AD and Kerberos services.
For this example, we’ll use the domain essos:
realm: ESSOS.LOCAL
servers: MEEREEN.ESSOS.LOCAL
That wraps up Part 1 of this Active Directory reconnaissance series 🔍🎯
We’ve taken our first steps to understand the environment and lay the groundwork for further exploration.
Next time, we’ll focus on user enumeration, a key phase for identifying targets and planning attack vectors within AD.
See you in Part 2!
–Hackers are people too 😜
Got questions, suggestions, or want to share your experience?
Drop a comment below 👇💬

